

~~~~~~~~~~~~~~~~~~~~~~~~~Materials~~~~~~~~~~~~~~~~~~~~~~~~~~
- Bat House
- Treated Wood
- 3 wood planks (cut to fit the width of the bat house) (referred to as support brackets)
- Screws to fasten bat house to support brackets
- Bolt (we used 6" long, 3/8" wide) with washers, nut
- Lag screws to fasten beam to post
- Lag screws to fasten support brackets to beam.
- Cordless drill and bits to suit your needs
- Tape measure, pencil, level, framing square
- Work gloves, hard-hat, other protective gear
- BATS!
~~~~~~~~~~~~~~~~~~~Before the installation~~~~~~~~~~~~~~~~~~~~~
Decide where to put the house
South or South East facing is usually best. You want the house to get sun first thing in the morning, and remain sunned for at least 8 hours/day, but preferably 10 to 12 hours. Avoid placing it near shade casting trees. However, do not avoid trees altogether. You should think about what a bat would consider an attractive neighborhood. Proximity to trees, open water, and wetlands are important, as they provide the bats' food: Insects!Houses can be installed on a post, wooden beam, or on an existing structure like a house or barn. When installing on a post/beam, opt for a large capacity house to allow heat retention. Single or double chamber houses will lose their heat too early in the night. These smaller houses can be installed on the sides of houses/barns because those buildings give off some heat.
If you live in the Northeast, paint your bat house BLACK. It is essential for absorption of heat.
Manage the vegetation
 If you had to knock down vegetation to install your bat house, you'll need to continue to manage that vegetation. Bats need room to exit the roost, so shrubs/trees growing under the house can quickly become a problem.
 We chose to place this house in an invasive Japanese knot weed stand for a couple of reasons. First, the vegetation would self regulate its height, so as not to grow above the height of the bat house and shadow it. Second, we knew the ground here would be suitable for setting a post about 4 feet deep. Once we decided on a spot, we knocked down a large area around it to allow for room to work. The wooden beam we will be hoisting into the air is 16 feet long, so we needed to keep that in mind when clearing a working area.
Prepare the Materials

If you're installing a free standing house, you'll need to attach support brackets to the main beam or post. These will be perpendicular to the post/beam, and the house will be secured to these. Be sure these are secure and level.
We attached the brackets using pre-drilled holes, lag screws, and washers.
Pound the post or Dig the hole
 This only applies to you if you're installing a free standing house. This may seem like a simple step but it can easily backfire. Having a level support beam is KEY!. Whether pounding a post into the ground or burying a beam with cement, be sure to use a level every few seconds to ensure it is not going in crooked.
If you're using a post:
Measure the distance from the ground to the hole you'll be using to attach the beam to the post. In our case, it was about 41". Now, pre-drill a hole that distance from the bottom of the beam to accommodate the bolt during installation.
 This only applies to you if you're installing a free standing house. This may seem like a simple step but it can easily backfire. Having a level support beam is KEY!. Whether pounding a post into the ground or burying a beam with cement, be sure to use a level every few seconds to ensure it is not going in crooked.
 ~~~~~~~~~~~~~~~~~~~~~~~~~~~Installation!~~~~~~~~~~~~~~~~~~~~~~~
Step 1. Attach the bat house

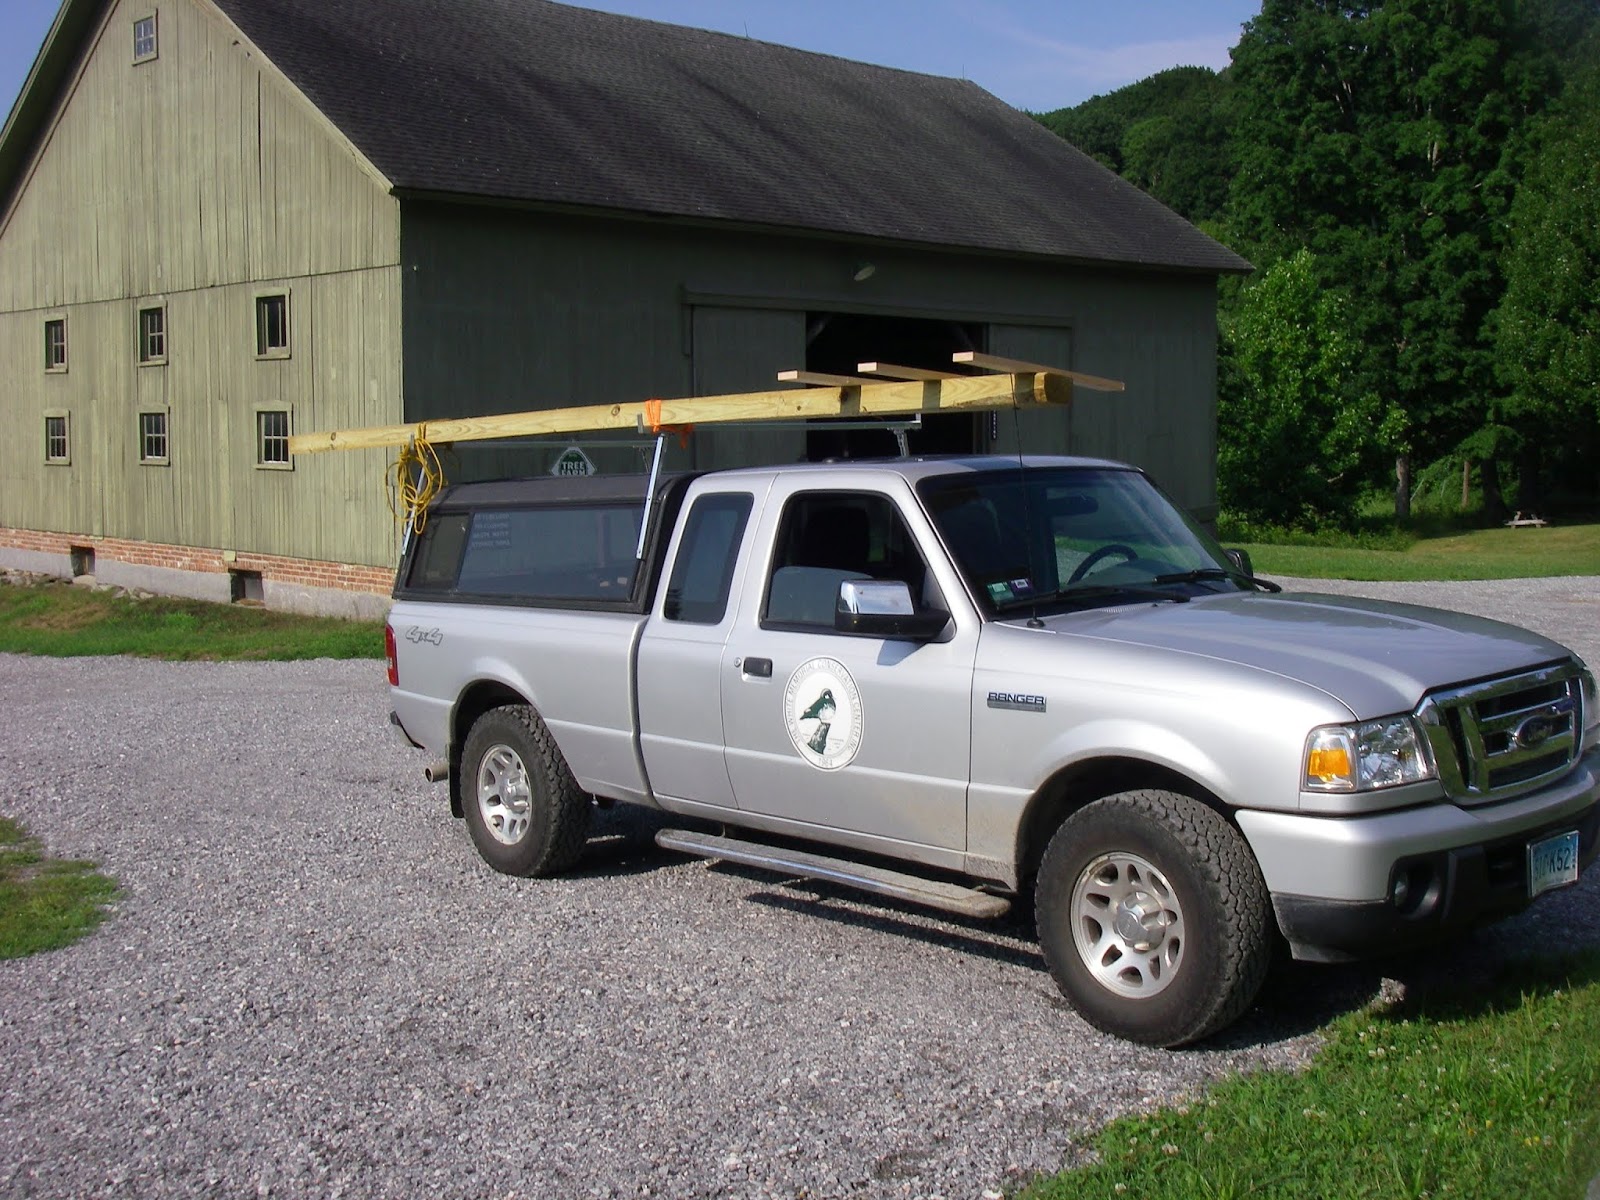
 A pick-up truck served as the perfect platform to place the beam on before rotation. Saw horses could work just as well. Once the beam is in place and the bolt is secure, the bat house can be screwed into the brackets. We also used washers in this installation.


Step 2. Attach the beam to the post

To attach the wood to the post, we used a 3/8" bolt. We started out with the beam horizontal (perpendicular to the post). The bolt will act as a fulcrum from which the beam will rotate to its upright position.
Step 3. Rotate beam to lift bat house into the air

This step can be tricky and requires at least 4 people. Because this set up is top-heavy, getting it and keeping it vertical is a challenge. Once the beam is vertical, use ratchet straps to secure it in place. DO NOT ever take all the hands off the beam until the very end. Once the ratchet straps are taught, you can ensure your set up is level.

Now you can insert the lag screws to secure the beam to the post. We used three and placed them about equidistant apart. Make sure everything is tight and let go.
You now have successfully installed a bat house! Congrats!
To learn more about bats, see these links from the CT Dept. of Energy and Environmental Protection:
- Bat Fact Sheet - This link gives an overview of bat biology, ecology, management, and other information about building a bat house
- Bat In Connecticut - This link tells you what you can do to help save Connecticut's bats. Note the bottom of the page has several other links to articles written about bats in Connecticut- mostly pertaining to White-Nose Syndrome.
You can purchase a bat house, online, from https://batmanagement.com/collections/bat-houses
No comments:
Post a Comment